Copyright Information

Thank you for stopping by my blog! I hope you enjoy the things that I create and share! I do have a copyright on my original creations (see logo on my sidebar below).
If you create and post a creations based off of mine, please refer (with a link) back to my blog. Please do not use my ideas for files, profit or for contests. Thank you!


My Craft Goals for 2015

My Goals for 2015:

1. Update my goals for 2016 in January of 2016 :)
2. Maximize my crafting time!
3. Keep plugging away at scrapbooking photos!!
4. Learn how to Heat Press!!
5. Have fun!


Showing posts with label WB Garden of Words. Show all posts

Friday, April 29, 2011

Stripes & Dots Challenge ~ Spring Fever

This week's Fabulous Friday Challenge at Frosted Designs is Stripes & Dots.  I had a hard time mixing stripes and dots.  I was planning on making the catepillar all stripes, and the grass dots, but cut my striped paper (a scrap) wrong (and ruined half of the circles) and a new plan was formed!!

I used my gypsy to to create this layout.  I found grass from WB 2 A Garden Of Words and sized it to 6" wide.  I cut four. 

I took some pieces of the catepillar's body and hid the letters.  I welded three body sections (3 letters each) together and then welded a head on top.  The head was a little small, so I sized a circle to 1.77w x 1.71h and welded it on top.  I sized nine circles to 1.32w x 1.27h to put on the body of the catepilar.

The grass was not long enough, so I glued it to the back of some green paper strips.


I glued on the circles every other one stripes then dots. 
I added some green stickles around the circles and red stickles for a mouth.  I added some gold gems for the eyes and antenaes.

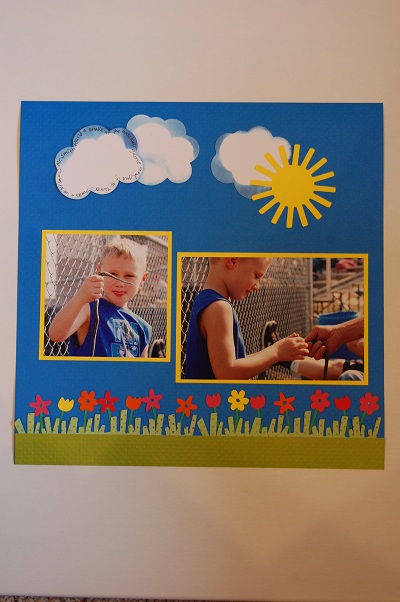
I found these clouds from Create A Critter, the sun from CM Cheerful Seasons, and the flowers from WB2 A Garden of Words.  These flowers were cut from green paper for the stems.

I found the word Spring from Straight From the Nest and the letters for fever from Nursery Rhyme.  I copy and pasted the flowers and separated them into sections so I could cut several colors out at once.


I cut off the stems from the colored pieces and glued the flowers onto the green pieces. 
I took the clouds and inked the edges with light blue.  I flipped over a couple of clouds and used them to mask off the white part of the cloud and fill in the blue.

I saved the scrap/negative piece of my "fever" paper to use as a template.


This is one of my favorite parts of using my Gypsy!!

I added some photos of Tanner holding a snake he found at his brother's baseball game.

He was a bit sad that I would not let him bring the snake home....

Join the fun (and great prizes) at Frosted Designs with your own card, layout or project with Stripes & Dots!

Tuesday, January 25, 2011

Baseball Cuts, paper cuts not team tryouts!!

It is hard to believe that with 8 inches of snow on the ground I am thinking about baseball!  My son is a sophomore and plays baseball.  He is a catcher and spends a lot of time at an indoor training facility catching during pitching lessons during the off season.  We received a catalog in the mail for t-shirts, which inspired me to create these scrapbook cuts.

I also have been testing the Gypsy/Imagine update and created these cuts.

Here is the page of the catalog that got my brain spinning!!

Here is the cover and the web address to give credit to for my project idea: http://www.protuffdecals.com/
They have some neat t-shirts!!

I used Base Camp font for this one.  I welded the verbs together, then the OUT to the side.

This was also Base Camp.  I added a baseball bat to the bottom to hold onto the H and E.  I played with font size to stretch out the "OTE" in protect.

I used Varsity Letter for this one.  I am often heard saying "No Excuses" to my son as he bats.  I know it really really helps him hit the ball!!!!  (actually it is out of my mouth before I realize it and then I get the death stare ~ I try to keep sunflower seeds in my mouth to prevent this)

This one is made with Word Builders 2: Garden of words.  I used Hide Contour to hide the bug body parts.  This font works well with a solid surface.  I am not sure this is "manly" enough though for the scrapbook, this one might not make the cut (pun intended).

Here is home plate flood filled with baseballs at 8" and the word Baseball flood filled with wood planks from Shapshot: Everyday Imagine cartridge.  If you look closely in the picture, you can see my Gypsy with the Imagine application on the screen.
Here are my four cuts once again.  Helpful hint:  Because I was welding quite a bit, I opened 4 different layers and put each cut on one layer.  When you weld and preview, each weld slows down the process a little bit.  By separating the projects into different layers, the preview time was a lot quicker!  

I also put each cut in a different quarter of the mat so I did not need to change paper.  Layer 1 was the top left quarter, Layer 2 was top right, etc.  I just changed the layer,  re-loaded my mat and cut.

Here is my baseball + Snapshot Everyday baseball cuts once again.

I will be using these cuts later on when I have some baseball photos to scrap!  Take me out to the ball game......