Copyright Information

Thank you for stopping by my blog! I hope you enjoy the things that I create and share! I do have a copyright on my original creations (see logo on my sidebar below).
If you create and post a creations based off of mine, please refer (with a link) back to my blog. Please do not use my ideas for files, profit or for contests. Thank you!


My Craft Goals for 2015

My Goals for 2015:

1. Update my goals for 2016 in January of 2016 :)
2. Maximize my crafting time!
3. Keep plugging away at scrapbooking photos!!
4. Learn how to Heat Press!!
5. Have fun!


Showing posts with label Pop-Up Neighborhood. Show all posts

Saturday, November 10, 2012

Christmas/Holiday Banners for Special Needs Kids (Day 2)

If you are looking for the FROSTED DESIGNS BLOG HOP - go HERE!!

If you are looking for the MY CALENDAR BLOG HOP - go HERE!!


Welcome to the Christmas Banners for Special Needs Kids!!  Today is Day 2 of a 3 day hop.  If you missed Day 1, please hop over to Ellen's BLOG to see some fabulous banners!  Ellen is also the beginning of today's hop and tomorrow's hop!

"In the eyes of children, we find the joy of Christmas. In their hearts, we find its meaning."

As joyous as Christmas is for most families, for some, their holidays are filled with worry, medical treatments and tests, and pain -- for their child must be hospitalized or she or he needs long-term care rather than being home with their families. 

For these kids, Santa doesn't slip down a chimney but rather, often comes in the guise of community volunteers who help make the season bright.  


This is the second Christmas season that our own band of dedicated and loving paper crafters have come together to make Holiday banners for children who are too sick to be home for the holidays.  Welcome to the Christmas Banners for Special Needs Kids blog hop!

I am especially pleased that this year, not only have our numbers of generous crafters swelled so our Hop is over three full days, but also, that we have partnered with another great cause and recipient of our banners!


By teaming up with Madison Womack's I FEEL THE LOVE PROJECT, the banners our crafters have handmade will be going to the hospitalized children at Children's Hospital Central California


Our wonderful sponsors are:


These sponsors have already agreed to contribute to our CHRISTMAS/WINTER HOLIDAY Blog Hop (November 10-17). Please patronize these vendors as our way of saying thanks!

  1. Susan Bermudez, Independent Consultant for Creative Memories, donating a $20 gift certificate for Creative Memories products from her catalog (http://www.mycmsite.com/sites/susanbermudez/).
  2. Lucy Kelleher, Independent Consultant for Close to My Heart, donating a $20 gift certificate for CTMH products.
  3. Scrappin' Madge: $25 Gift Certificate to The Scrappin Lounge Shoppe.
  4. Fresh Brewed Designs: Two prizes - One prize is a rubber stamp, Item #497 "Cutie Pie Ice Skating" (http://www.freshbreweddesigns.com/item_497/Cutie-Pie-Ice-Skating.htm), and the other is a $15 Digital Stamp gift card.
  5. The Paper Temptress (www.papertemptress.com) - Owner Patricia Dunbar will donate a $25 Gift Certificate to her online store, the Paper Temptress.
  6. The Pinque Peacock (www.pinquepeacock.com) - Owners Jessica Shelton will donate a gift certificate to her NEW store (products are being added daily -- watch as she grows!)


Here is a complete list of blogs in case you get lost along the way:


  1. Ellen ♥ CardMonkey - http://cardmonkey-business.blogspot.com/
  2. Jessica S - http://jessicascraftshaque.blogspot.com/
  3. Lezlye - http://lezlyes.blogspot.com/
  4. Lori - http://www.scrappinmystressaway.blogspot.com/
  5. Jenny D - http://www.yogimemories.blogspot.com/
  6. Lissa Marie - http://somanycrafts.com/
  7. Robin - http://scrapandchat.blogspot.com/
  8. Scrappin Madge - http://thescrappinlounge.com/
  9. Jeannie - http://polkacabana.wordpress.com/
  10. Rebecca T. - http://craftingwithrebecca.blogspot.com/
  11. Lisa T. - http://bitbythecricutbug.blogspot.com
  12. Kimi ~ http://lovebugcreations3.blogspot.com
  13. Beth~ http://motherandaughterdesigns.blogspot.com
  14. Dena ~ http://missdjones.blogspot.com/
  15. Patricia ~ http://blogs.papertemptress.com/
  16. Robin L - http://create-a-latte.blogspot.com/
  17. Jenny - http://crazyaboutcricut.blogspot.com/


First, let me show you the banner I made for today's post. I'll be sending this to Madison and the children at CHCC who are benefiting from the I Feel the Love project in December:

I started with this simple banner cut from train cars.
I found these train cars on Pop-Up Neighborhood and sized them to 4 inches.


I cut out the train cars with watercolor paper.  I used multi cut 2 times.

I also cut out the train cars in Christmas paper from K and Company.
Faith is from Home Accents sized to 2.76 inches.

Hope is from Home Decor sized to 2.65 inches.

Miracle is from Home Decor sized to 1.82.

Believe is from Gypsy Wandering sized to 2.06 inches.

I cut them out of black shimmer cardstock.


I added a little black stickles on the wheels and strung the cars together with tulle.


My second banner is what I call the Bonus Banner.  I used leftover pieces from another project that took on a life of its own and totally changed.  The only new part was the word Christmas!
I took these tags from Teresa Collins Christmas Sentiments (CCR Exclusive) cut out at 6 inches on Kraft cardstock. I stamped them with PinkByDesign's Distressed Music background stamp.  I used Walnut Stain ink for the stamp and to ink the edges.

The Trees were cut from Teresa Collins Christmas Collage (CCR Exclusive) and are sized to 5.35 inches.  I used chevron paper from Hobby Lobby to cut them out.

I used Storybook for the letters.  I sized them to  1.71 inches and cut them out of maroon cardstock.

I used some ribbon to string the banner pieces together.


It is such an amazing feeling to create these banners to help brighten the day of a child and his or her family.

Your next stop in this hop is my friend JENNY.


Monday, June 4, 2012

Class Picnic (LO)

Hi ~ Lori here from ScrappinMyStressAway!!

I am excited to be here at She's A Sassy Lady with a 2 page layout I created BEFORE I broke my right wrist.

Tanner's Kindergarten class picnic was held at our neighborhood park the last Thursday of the school year.  Tanner played soccer, football and baseball with his friends.  I wanted to capture this special day for him.

Of course, I started with my Gypsy: 
I found the soccer players from Sports Mania and sized them to 2.08 inches.

I found the grass from A Child's Year and sized them to 2.85 inches.  I ended up cutting two sets.

I grabbed the sign from Street Sign and sized it (and the layers) to 3.16 inches.

I used letters also from Street Sign to spell out PARK sized to 1 inch.

I found the swingset and slide from Pop-Up Neighborhood sized to 1.77 inches. 


I used the font from Nate's ABC's sized at 1.56 inches.

I opened up another layer and grouped the green cuts all together.

I opened another layer in order to group the rest of the cuts by color.  I cut everything out of cardstock.


I pop-dotted the grass cuts over the photos and park sign.

I used my Cricut Imagine and the Hopscotch cartridge to print the cloud paper.  I printed one 12x12 sheet and cut it in half - one for each page.

I crinkled up some creme colored cardstock and inked it to look like sand.  I put the swingset and slide in the sand.

I did not use the shadow layer for the title because I cut the wrong shade of blue.  I liked it better without a shadow, so I left it.
I journaled on a cloud.
I have been trying to use more than one patterned papers in my layouts - I am still not comfortable with this!!!  I used a string of green twine to separate the sky from the polka dotted grass.

Thanks so much Sheila for having me over today!!!


Saturday, May 19, 2012

Mount Rustmore from Castaway Cay (Disney/Pixar Blog Hop)

Welcome to another Original Disney Pixar Blog Hop!!

If you are looking for the Memories in Tyme Wedding/Anniversary Hop please go HERE!

This is a 2 day hop, I am only hopping on Day 1, but my post will be up for both days in case you want to come back and catch the blog addresses for Day 2.

Here is a complete line up for both days:


Day One - May 19th
Shawn http://craftychicsblog.blogspot.com/
Ellen  http://cardmonkey-business.blogspot.com/
Tami  http://tamiscraftconnection.blogspot.com/
Madison http://www.funkycards.blogspot.com/
Cathie http://www.creativecutterroom.com/
Lori  http://scrappinmystressaway.blogspot.com/***HERE
Amy Chomas http://amychomas.blogspot.com/***NEXT
Kathy http://kathyscozies.blogspot.com/
Amy Voltz http://www.lovetocrop.com/
Sarah http://www.pinkcricut.com/

 Day Two - May 20th
Shawn http://craftychicsblog.blogspot.com/
Ellen  http://cardmonkey-business.blogspot.com/
Kim http://uscrap2.blogspot.com/
Bobbi Jo http://sweetsassydiva-gspot.blogspot.com/
Jenny http://jennyplace26.blogspot.com/
Jessica http://thecreativestamperspot.blogspot.com/
Jenny http://www.crazyaboutcricut.blogspot.com/
Tami http://www.scrappinrabbitdesigns.blogspot.com/
Kathy http://kathyand3kids.blogspot.com/
Kristal http://www.gettingcricky.com/

We went on our very first Disney Cruise last October.  We have been to WDW several times, but never Disneyland or a Disney Cruise.  This was a whole new experience for me.  I did miss getting up at the crack of dawn and being at the parks all day long until after the night show/parade.....but we will go again in 2013 when Fantasyland is open!

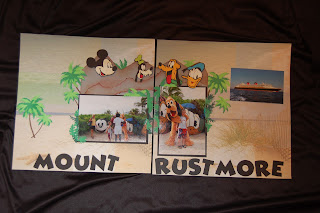
I think the highlight of the cruise for me was our day at Disney's private island Castaway Cay.  There is a character spot at Mount Rustmore which is Disney's version of Mt. Rushmore.  I thought it would be fun to re-create this into a mountain backdrop.

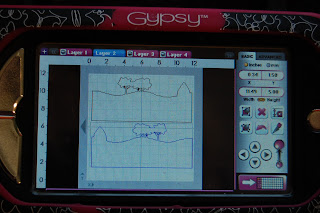
When I plan a 2 Page layout, I open a 12x24 mat on my Gypsy.

I put the mountain from Pop-Up Neighborhood sized to 11.50 x 7.23 and centered it.

I used the font from Mickey Font sized to 1.46.  I picked this size so that the word Rustmore would fill the page.

I opened another layer and put Mickey, Goofy, Pluto and Donald from Mickey Font on.  I included all of the layers.


Here are my heads!!  I flipped Mickey and Pluto so they face the opposite direction.

I cut out the mountain in silver cardstock and used my Brick Red and Vintage Photo to "rust up" my mountain.  I tore some extra strips of silver cardstock to add dimension.

I rusted up the character heads and then pop-dotted them onto the mountain.


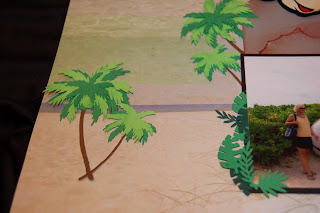
I added some palm trees and leaves from Life Is A Beach.

I added a picture of the Disney Dream (from a postcard) to the ocean in the background.

Thanks so much for stopping by!  I hope you enjoy my project and tutorial.  I do have some Disney themed blog candy to share today.  You just need to leave me a comment here that has #1 your favorite kind of vacation (Disney, beach, camping, ski trip, etc) plus a favorite memory from one, #2 a way to contact you.  I will let Mr. Randy pick the winner on Tuesday the 22nd.

Our Sponsor of this Blog Hop is


Your next stop in this hop is the Amazing Amy Chomas!


Tuesday, January 24, 2012

Pumpkin Patch Landscape LO

This week at SweetSassyDiva's our theme is a Scene.  I created a Pumpkin Patch Scene 2 page layout.  Every fall, I take my daycare kids to The Bellevue Berry Farm and Pumpkin Patch near my house.  We look forward to it every year!

This layout took me 3 days and (merging) two different ideas to complete!!  I changed my mind so many times I lost count!
I started with this hill from Pop Up Neighborhood (found in the Accessory Function) sized at 5.00h x 11.49w.  I copied a second scene and flipped it.


I opened up a new Layer and took the shift layer of the Accessory Function and put the hills on my mat twice.  I flipped the second one.

I opened another Layer and put the Accessory Layers on it twice.  This was the trees and trunks.  I flipped the second layer.  I positioned the pieces on my mat by color for easier cutting.

Once I cut out the hill layer (without the trees) and set them on my workspace, I thought there was too much sky showing.  I cut another set of hills.

I needed some other pieces for my Pumpkin Patch, so I opened up an old file that I started but did not use.  I tried to cut the wheat from Pop Up Neighborhood, but as you can see below the paper tore.  I liked the barn, pull cart and the tractor.  I thought I might use the pumpkins but changed my mind. 


I went back to my first file and added these pumpkins from Pumpkin Carving.  I welded two sets together (sized at 1.24 inches) to make a large border.  I grabbed the cart and campfire from Old West, but ended up not using them.  I found the Pumpkins from Chic and Scary and sized it to 6.32w x 2.18h so it would fit across the top of my 4x6 photo.

I journaled on the hay in the cart.  I pop dotted the barn and some of the pumpkins.

I added twine across the bottom.  I filled in the pumpkin border with some additional pumpkins.

I used some lime green stickles to color the stems on the pumpkins.

I have been saving this cloud paper for some time ~ glad I finally got to use it!!  Thanks for stopping by!