Copyright Information

Thank you for stopping by my blog! I hope you enjoy the things that I create and share! I do have a copyright on my original creations (see logo on my sidebar below).
If you create and post a creations based off of mine, please refer (with a link) back to my blog. Please do not use my ideas for files, profit or for contests. Thank you!


My Craft Goals for 2015

My Goals for 2015:

1. Update my goals for 2016 in January of 2016 :)
2. Maximize my crafting time!
3. Keep plugging away at scrapbooking photos!!
4. Learn how to Heat Press!!
5. Have fun!


Showing posts with label Cricut Alphabet. Show all posts

Saturday, April 27, 2013

Beautiful Bling Blog Hop Baby Girl Mini


Hello and Welcome to the Beautiful Bling Blog Hop!!

If you are looking for the Felicity's Be A Blessing Blog Hop, please go HERE.


Welcome to the Beautiful Bling Blog Hop!!  April's birthstone is a diamond, so we added some bling to our projects!  In this hop, you will see some BLINGY projects with rhinestones, stickles, glitter and more!!!

You should have arrived from Tricia's blog.  If you found me first, hop over to the beginning and see Melanie so you don't miss anything!!

Here is the complete line up in case you get lost!


And now on to my project:


I used Nursery Tails and my Cricut Imagine to print and cut out the baby girl pieces.

I bought this chipboard album at Michaels.  One side of each page is covered in canvas, the other side is blank chipboard.  I flipped every other page so the canvas was next to canvas.


The blank pages were covered with a pink cardstock.  I used some patterned paper to create photo mats and a pocket.

The bib and bottle are pop-dotted on the corners of the 4.25 x 4.25 inch square.  I did not stick down the pieces that overlap the mat so a photo can go under them.


You can see that I inked the edges of the pages in bright blue. 


I added a butterfly from my stash on the back.  The Baby is from Cricut Alphabet.


I added my bling to the cover.  I put gems on the bodies of the butterfly and dragonfly as well as BABY.


Thank you for stopping by!!

Your next stop is Pamela!


Friday, January 11, 2013

All About Penguins Blog Hop


Welcome to the All About Penguins Blog Hop!

If you are looking for Teresa's First Blogaversary Hop, please go HERE.


We're so glad you could join us! Today we'd like to share with you a whole bunch of crafty projects made using our favorite, adorable, and lovable winter friends... penguins!


This hop is all about.....well penguins!!!  You should have arrived from Melissa (iamapapermaniac).  If you found me first, hop over to Ashley's BLOG so you don't miss a thing!!

Penguins are very cute and fun to watch!

Fun Facts about penguins courtesy of http://users.tellurian.net/teach/penguins/facts.html
They are the smallest of the Antarctic penguins. The male penguin takes care of the egg. They build nests of stones, and will fight over the best rocks. They are powerful swimmers. They can jump straight out of the water onto the land. They love to sled down icey hills on their bellies. They are very playful. Baby Adelie penguins grow the fastest of all penguins. Leopard seals are their biggest enemy.

Here is a complete list of Blog Addresses in case you get lost along the way:


14. Christine http://hotberrydesigns.blogspot.com/*****NEXT
15. Lissa Marie www.somanycrafts.com


Now on to my penguin:

Originally I wanted to make a layout with a penguin or two.  We went to the zoo on Christmas Eve as a family and I brought my camera.  We have an amazing zoo - Omaha Henry Doorly Zoo - and if you ever get a chance to visit it you won't regret it!  Our aquarium was recently renovated and it is awesome, but my pictures of the penguins did not come out because of the glare of the glass.

Sooo, plan B was to make a fun little penguin card.

I found this adorable penguin on Cricut Alphabet.  I used My Cut Search to look for penguins.  I would have never thought a font cartridge would have a penguin on it!!!

I sized my penguin and the layers to 3.10 inches.  The Chill Out is sized to 1.94 inches - it is sized to fit behind the penguin.

I used white, black and orange cardstock from my scrap pile to cut out the pieces.
I love making window cards!  

I found this frame from Christmas Cheer.  I put two on my mat side by side and hid the inside cut on the frame on the left.   I put the penguin shadow piece inside the frame.  I welded the card base together.

***NOTE I sized the card first then determined the size of the penguin to fit inside the frame.

I cut it out of white cardstock.  I have the best luck with cardstock from Wal-Mart in the office supply section (8 1/2 x 11).  Any other white cardstock doesn't cut as well on my cricut.

I trimmed off the feet of this layer so the orange feet would show through.
One of my favorite features of the Gypsy is placing my image exactly where I want it on my mat.  I was able to place a frame in the center of the page so it cut out only the blue snowflake paper.

I have had this paper for 3 years and was happy to finally put it to use.  I must have loved it at some point.....today it worked for a project - YAY!

I glued the penguin layers together and then glued it to the front of the card.  I inked and glued the frame around the penguin.

I added stickles for the eyes and tummy sparkle.

I used the inside cut from the frame for the inside of the card.  I usually don't put a colored background with my window cards, but the white shadow of the penguin was getting lost in the white background.

I used my zig 2-way glue pen to adhere the sentiment inside.

I added some stickles to the penguin inside too.

I added a twine bow to her hair :)

I had so much fun making this card!  I usually scrapbook, but making a card every now and then is fun!


We have some fabulous sponsors ready to give away prizes to those who comment AND follow every stop of the hop!
$20 Gift Certificate

$20 Gift Certificate

$10 Gift Certificate


$10 Gift Certificate


*NEW* CTMH Paper Packet
Kit Includes: Chantilly 6 - 12x12 B&T Duos (2 of each 3 double designs)
6 - 12x12 Cardstock Sheets (2 Champagne, 2 Twilight, 1 Buttercup, 1 Cotton Candy)
Sponsored by our very own Vanessa
Please follow her Facebook page as well to be eligible to win

Winners will be randomly chosen and announced on Tuesday January 15th at Made Especially For You. Please remember that you most comment and follow each stop of the hop to be eligible to win! You have through this Sunday evening to hop.


You next stop in the hop is HERE.


Here's the complete lineup in case you get lost along the way:
14. Christine - http://hotberrydesigns.blogspot.com****NEXT
15. Lissa Marie - http://somanycrafts.com

Happy Hopping! :)


Thanks for stopping by today.  I would love to hear about the zoo you visit!!!


Saturday, November 10, 2012

My Calendar Blog Hop

Welcome to the My Calendar Blog Hop!  

If you are looking for the FROSTED DESIGNS FALL BLOG HOP - go HERE.

In this hop, you will find several kinds of calendars that are NOT you typical "hang on the wall" calendars.  I plan on using mine to keep me on track for my design team and blog hop schedules!


Here is a complete list of blogs in the hop just in case you get lost along the way (or find me first)!


Now on to my project::

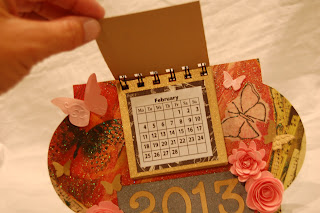
I made a fun desk calendar.  Each month is on a separate page.  I need to see the entire month at a glance so this words well for me.  I am on 4 design teams and will color code them to highlight each square.  Blog hops will have a separate color.  I have a detailed journal with ideas, projects and status information that would NEVER fit onto any calendar :)
I started with this shape from Lacy Labels and sized it to 5 inches.  I cut it out of chipboard using multi-cut 3 times.

I used paper from this 8x8 Colorful Life paper pad from DCWV.

I found a 2013 calendar online and printed it out on white cardstock.  I trimmed each month into its own square.

I thought I would use these scalloped squares to mount the calendar squares on, but they ended up being too square and there was not enough room for the binding.  I scrapped that idea and cut my own with my paper cutter.

I did use the 2013 from Cricut Alphabet sized to 1.35 inches.  I cut the letters out of gold shimmer cardstock.

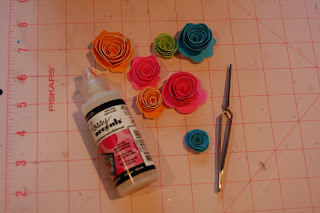
I used these 3D flowers from Art Philosophy sized from 3.29 to 4 inches.  I cut them out of pink shimmer cardstock.

I used my tweezers to roll the flowers from the smallest end to the center and used liquid adhesive to glue the flower together.

I used my Bind-It-All to punch the holes and attach the calendar pages.  I added some butterflies in gold and pink to match the paper I used.  I used a Stampin' Up cut and embossing folder for them.
Thank you for stopping by today!!  I hope I inspired you to create your own one of a kind calendar!!!

Your next stop in the hop is the fabulous KARON!


Saturday, August 11, 2012

Lori Layout

Today’s challenge is All About ME!!! When you look at your photos, normally it is you behind the camera, or making the preparations, but normally not in the photos themselves!  So, with this link up party and challenge - you will get a bit of both worlds, link up your projects that you have done AND a challenge to start your own album!  Memories in Tyme will have WEEKLY challenges for your All About Me album to get you started on your journey celebrating YOU!

I am the last stop in this short and sweet hop, so if you stopped here first please go to see Lynda! After Lynda is Lisa and then me!

 Make sure you share with us via the links below so we can see what you have all been doing!!!  And we have a few giveaways scheduled for the whole two weeks of challenges, so check back on the very last day for a fun list of what we are giving away! Now - your challenge is to create or share with us one of your favorite All About Me layouts!   You will get an extra submission if, you used everything from your supply and didn't spend money on this layout!  I love doing my "All About Me" album, and I hope you guys will learn to love them just as much!  Now, go check out these two projects...I know I'm excited to see what everyone has done!

And now for my project:

I have been experimenting with CCR with my Imagine.  I grabbed this scalloped circle shape from Cricut Alphabet and filled it in with a pale pink paper with a subtle design from Yummy.  I added this L from Font 3 from Cricut Alphabet.  I also used a fun paper from Yummy.

I printed this out.  Right now the Imagine will only print with CCR (unless you go back to a previous version of the update) so I just hand cut the scallop circle out. 

I typed several words on my computer that describe me that also begin with the letter L:  lucky, lacks patience, layout creator, Lori's Learn 'N Play (the name of my in-home daycare), laid back, loves to read, laughs often, leader, lend (a helping hand - not money he he), Liberty Lane (the street I live on) and Live (with all boys).  I printed them out on cardstock and trimmed them into little banner pieces.

I wanted some flowers for my layout.  I got out my Gypsy at opened up Art Philosophy for the beautiful rolled flowers.  I sized them 4.29, 3.25, 2.76 and 2.29 inches.


I cut them out in these bright cardstock colors.

I used my awesome tweezers to roll them up from the outside in.  I used my Glossy Accents to glue the rolled flower to the center.

I welded my name from Quarter Note.  I sized the welded word 4.51 width x 2.53 height so it would fill the space I had at the top of my layout.

I cut it out in orange cardstock.

I put it all together and used this 12x12 frame without the glass.  I have it hanging in my scrapbook nook!!

Be sure to join in our challenge and create a layout all about you and link it up HERE.