Copyright Information

Thank you for stopping by my blog! I hope you enjoy the things that I create and share! I do have a copyright on my original creations (see logo on my sidebar below).
If you create and post a creations based off of mine, please refer (with a link) back to my blog. Please do not use my ideas for files, profit or for contests. Thank you!


My Craft Goals for 2015

My Goals for 2015:

1. Update my goals for 2016 in January of 2016 :)
2. Maximize my crafting time!
3. Keep plugging away at scrapbooking photos!!
4. Learn how to Heat Press!!
5. Have fun!


Showing posts with label create a critter. Show all posts

Saturday, March 30, 2013

Hippo Gift Bag


Happy Easter and Welcome to the Little Prince Blog Hop Day 1 of 3!


We are celebrating the birthday of a sweet little prince Mason.  Mason is turning 3 and we all made Birthday Boy projects.

 If you arrived from Cancace's blog you are in the right place.  If you found me first, you should hop over to Jessica's BLOG so you don't miss a thing!  There are lots of goodies to qualify to win along the way!

Here is a complete list of today's blogs in case you get lost along the way:


Day 1 (Sunday, March 31st)

  1. Starts at: www.homespunelegance.blogspot.com
  2. Candace www.scrappin2littleprincesses.blogspot.com
  3. Lori A http://scrappinmystressaway.blogspot.com/ ****HERE
  4. Claire S http://www.scrapmyway.blogspot.com ****NEXT
  5. Debbie http://www.papersweeties.com/category/blog
  6. Lisa http://prettypaperprettyribbons.blogspot.com/
  7. Betty Dudley www.justabitofpaper.blogspot.com
  8. Heather Flaherty www.papercrafteranonymous.com


Now on to my project:

I wanted to make a cute gift bag.  I did not have the exact paper I wanted to use, so I used my Cricut Imagine to create a piece.

I used Imagine More to print this light blue paper.  Instead of polka dots, this paper had flowers on it.  I figured I could alter the paper and make it work for my project so I printed it out.


I found this adorable hippo on Birthday Bash.  I sized it to 8.5 inches.

I added the little hippo layer to the card sized to 2.06 inches to my mat.

I cut them both out of the blue paper.


I inked the edges of both hippos with Vintage Photo ink and a fantastyx.

I dabbed Close To My Heart dutch blue ink to the front of the hippos.


I put the rest of the pieces I needed to cut out on another Gypsy layer.  

I sized the ice cream cone and ice cream to 8.50 inches.  

The hippo toes, eyes, nostrils and belly button are also sized at 8.50 inches.

The card base is cut out at 2.06 inches.

The phrase is also cut out at 2.06 inches.

I cut out the cherry and leaf at 8.50 inches, but decided to use stickles instead.


I used white, brown (chocolate ice cream) and patterned paper to cut out my pieces.


Here is the little hippo gift card.  I added some stickle toes to him!


Here is a peek inside the card.


 I assembled the hippo and decided I needed some grass for him to stand in.


I used grass from Paper Doll Dress Up sized to 2 inches.

I cut out the clouds from Create A Critter sized to 1.35 inches, 1.47 inches and 1.94 inches.


I inked the grass and trimmed the bottom off and adhered it to the bag.  I tucked the hippo's toes behind the grass.  

I inked and stickled the clouds.  

I stickled the ice cream cone.

Finally, I tied the tag to the handle of the bag - now I just need to tuck in the gift!!!


Before you hop on, I have a little Blog Candy for you from Unity Stamp!!
***US residents only!

To be entered to win this adorable stamp set, you need to leave me a comment including a way to contact you.


Your next stop is Claire!


Friday, October 12, 2012

Boo Whoo Blog Hop


Hello and Welcome to the Boo Whoo Blog Hop!!

***UPDATE*** Whoot Whoot ~ Just found out that I made My Cricut Craft Room's Design Team!!!


Thank you for joining us at My Cricut Craft Room's Boo Whoo Blog Hop!!  Today's sponsor is Erica's Craft Room.  Please comment on all of the blogs in the hop to be entered to win the prizes:  Teresa Collins Chic and Scary Cricut Cartridge and Pumpkin Carvings Cricut Cartridge!!  You must be a follower of My Cricut Craft Room in order to win.

Here is a complete line up in case you get lost along the way!!


And now on to my project:
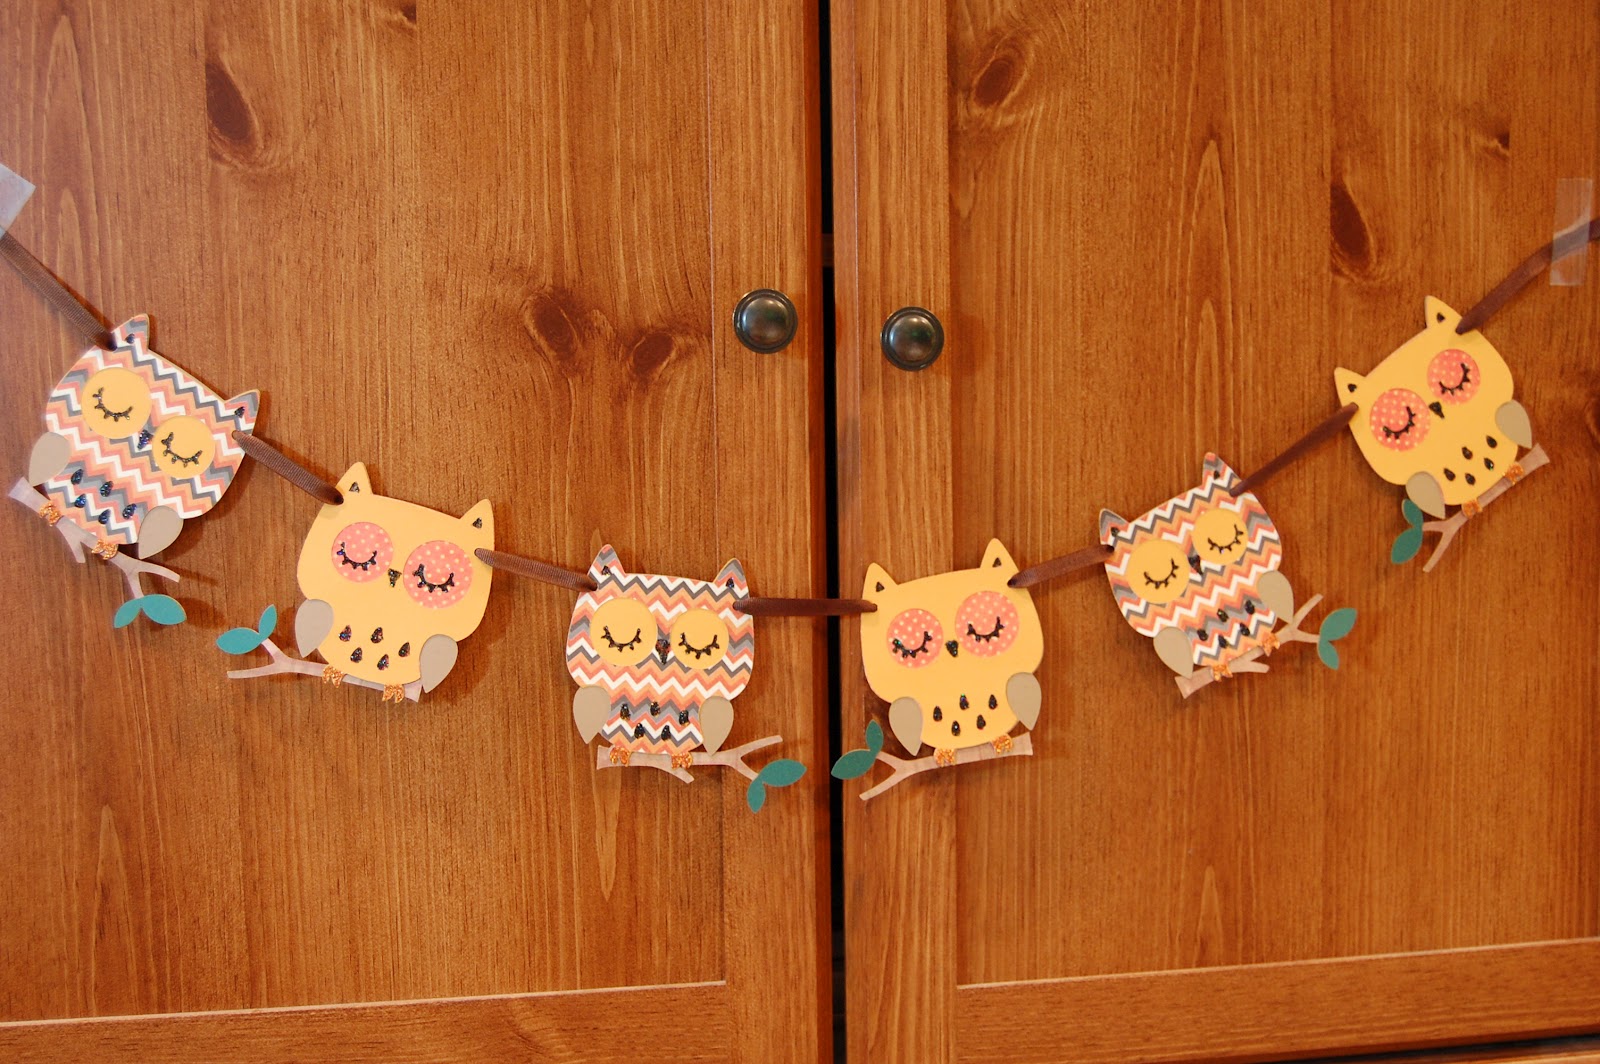
Real owls creep me out BIG TIME, but paper owls are super cute.  Maybe it is the head turning thing??  Maybe it is the screeching (or hooting )?  Maybe it is the size of their eyes?  I am not really sure, but there is something about owls that creeps me out.....

I almost did not make owls for my banner, but these ended up so cute!!!!


I used the owl from Create A Critter and sized it to 4 inches.  I used my Gypsy for easier cutting.  I cut out my owls out of brown Kraft cardstock.

This Gypsy layer has the Owl layer pieces on it.  I cut out this layer twice using a total of 4 different coordinating papers.

The third layer held the rest of the Owl layer pieces on it.  I cut out the branches in brown cardstock.  Later I  decided to alternate which way the branches faced.

I used black stickles to glam up the eyelashes, noses and chest feathers on my owls.  I used orange stickles for the claws.  I used brown cross grain ribbon and my Crop-A-Dile to attach the banner pieces together!

What is something that freaks you out in real life, but is totally cute made out of paper??

Thank you for stopping by!!  Your next stop in the hop is HOLLY!

Friday, September 21, 2012

Candy Corn Card (Triangle Challenge - Frosted Designs)

This week at Frosted Designs our challenge is Triangle.  I was going to make a banner, but thought about my favorite fall candy and decided to make a card instead.

I used this image from Create a Critter sized to 4 inches.  I created the shape card by copying and rotating the shadow layer of the candy corn.  I welded the two together.

I cut out the pieces in cardstock.  I did not want the mouth to show through, so I cut an extra layer in yellow.  I measured and cut the yellow strip (minus the mouth) and adhered it to the orange layer.

The extra white triangle piece is a little smaller (3.76 inches) and is for the inside of the card.

I stamped You are so sweet from Kinderstampo and tied some twine around the candy (before I adhered it to the card base.

Here is my sweet little card!!

Monday, April 30, 2012

Diamonds Challenge (Sweet Sassy Diva)

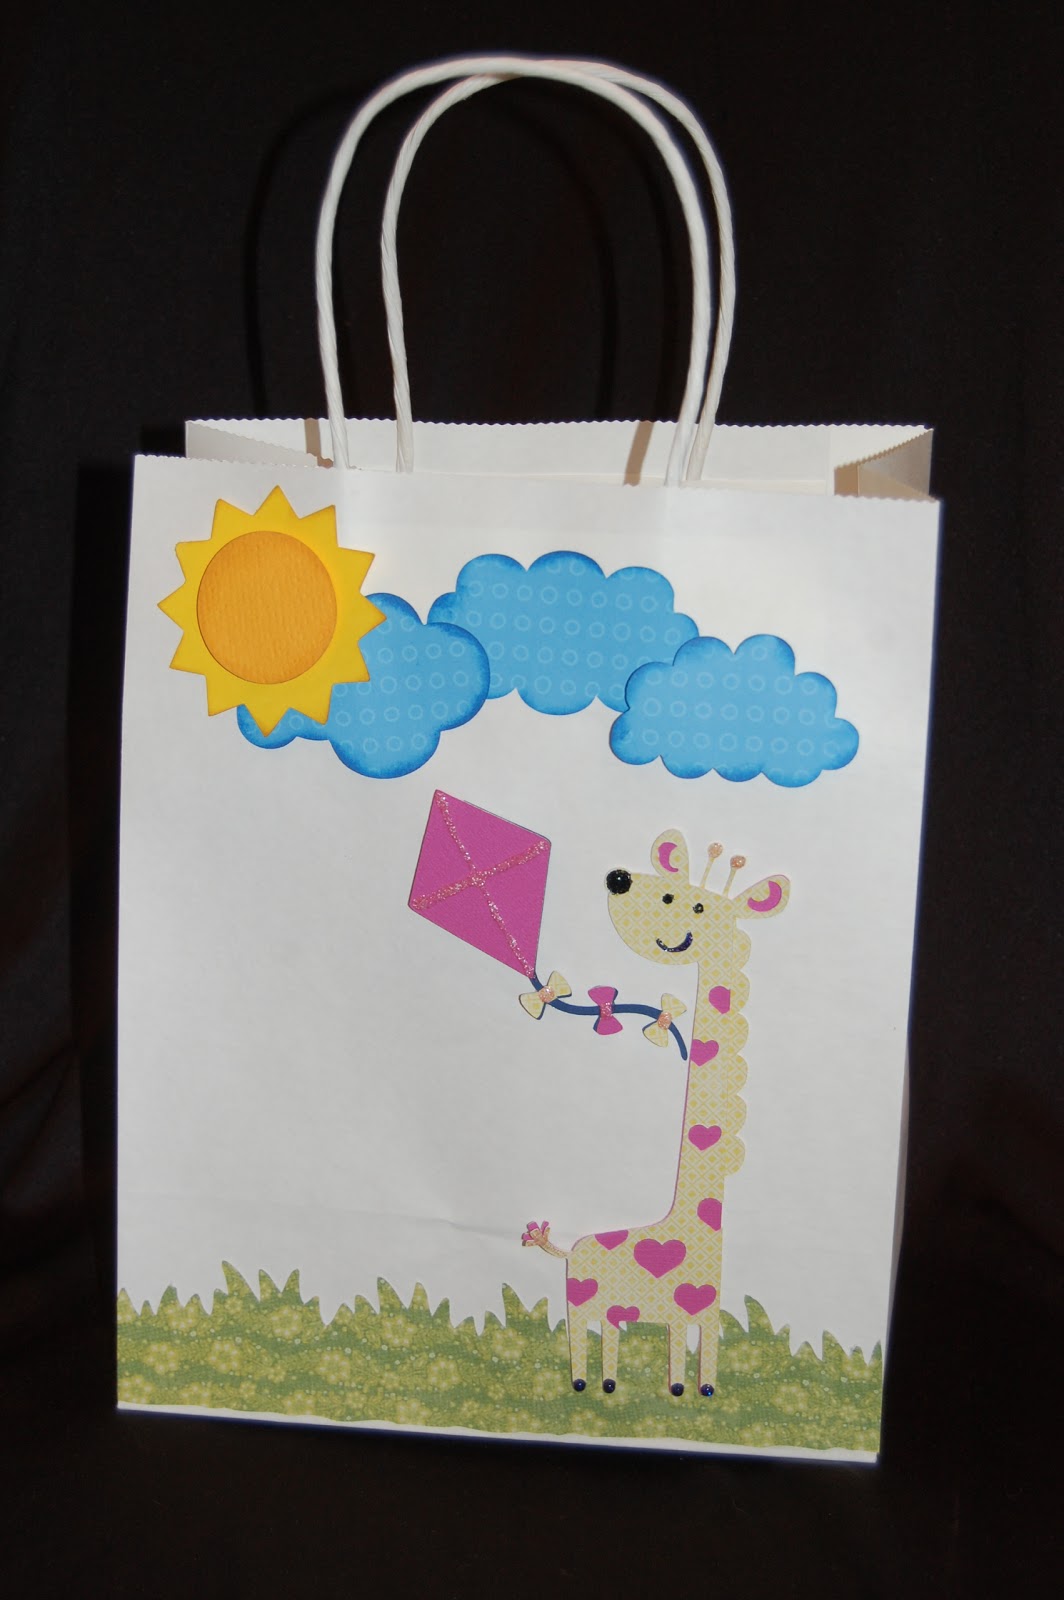
Hi!  Lori here from ScrappinMyStressAway and I am super excited to Design today!  This week at Sweet Sassy Diva, the challenge is to use a Diamond in your project.  I made a gift bag for a very special little girl.  I have a new little baby girl who will be coming to my daycare in a couple of months.
Tanner and I are holding Baby Grayson ~ isn't she beautiful!  Her big sister loves Elephants and has a special lovey that is a pink elephant.  Mom picked out a Giraffe for Grayson so I decided to make a Giraffe gift bag to hold her gift from me.


I picked the Giraffe from Create A Critter and the coordinating Kite (aka diamond).  I put the layers of the giraffe on my mat sized at 3.24 inches.


Instead of using the top layer with the round spots on it, I copied a second middle layer and added hearts as my spots.  I did not weld, instead I grouped the hearts (George and Basic Shapes, variety of sizes) with the giraffe body so they hearts would cut out.

I added some grass from Paper Doll Dress Up sized to 1.73 inches.

I added a sun from Create A Critter and some clouds from April Showers.

I used yellow, pink, green and blue cardstock to cut out the pieces.


I used some ink, pop dots and stickles to add some dimension.

Here is my gift bag ready to stuff full of goodies!!  

Thanks for having me over today Bobbi Jo!!


Friday, April 6, 2012

Rain, Rain, Go Away ~ Card

Today I am the Guest Designer at Sweet Sassy Diva's blog and I have a Rain, Rain, Go Away card to share with you.  

I used the giraffe from Create A Critter sized to 3.59 inches.  I took the umbrella from April Showers.  I grouped the layers and stretched them so the size is 2.40 width and 4.31 height.  

I put scraps of papers on my mat and cut them out.

I used orange and brown twine to create a mane.  I put some adhesive on the back of the brown layer and cut small strips of twine.

I assembled the giraffe one layer at a time.  I added some stickles for the eyes, mouth and antenna thingies!

I added stickle raindrops to the card and a little twine bow to her head.  I used glossy accents on her spots. I think this card will be appropriate for a support or sympathy card.

Thanks for having me over today Sweet Sassy Diva!!

Wednesday, December 21, 2011

Bowling Raffle Items

 It's that time of year again ~ my son's team is hosting a Bowling Tournament for High School Bowling.  I usually make an item or two for the raffle.   This year, I made these bowling projects.  The bowling mini album is paired up with the scrapbook page (in a 12x12 frame).  I used a rectangle chipboard mini album found at Michaels in the dollar bin.


I used George for the rectangles and circles, Varsity Letter for the font, and Paper Doll for the juggling pin (aka bowling pin).  I save a file on my gypsy with the rectangles so I can easily add a title and some images.  This is set for two horizontal 4x6 photos.
I also created this tile with images from:
Base Camp ~ Strike at 2.06 inches rotated at 90 degrees
Sports Mania ~ Discipline Strength Honor at 2.88 inches.  I hid the inner cuts on the "o" and added three circles to mimic the bowling ball
Hello Kitty Greetings ~ suitcase (aka bowling bag) at 4.06 inches
Nifty Fifties ~ Bowling pin and ball at 7.24 inches and "bowl" at 3 inches and welded together
Create A Critter ~ turkey shadow layer at 2.18 inches (I hid the beak)
Cherry Limeaid ~ gutter ball at 1 inch welded together
Cuttin' Up ~ spare at 1.47 inches and welded together
Nifty Fifties ~ Split at 2.18 inches
George ~ bowling ball (4 circles grouped)
Lyrical Letters ~ it's all about the shoes .76 and 1.38 inches
Graphically Speaking ~ Trophy 2.25 inches

I cut it out of black vinyl and put it on a 12x12 tile.
You can see a link to one of my vinyl tutorials HERE!

Saturday, December 17, 2011

Note Pads for my Kids!

I made personalized note pads for my daycare kids and their siblings who are in school.  I personalized them by using several cricut cartridges and papers.  Ayla loves cats and her sister Abby loves dogs.
 William and Eli love trucks and trains.
 McKenna and Elle love dance.
Luke and Tanner love baseball.
Mallory loves lady bugs and Sierra loves tie dye and soccer.
 Sterling and Alex love football.
 Colton loves soccer and Jadon just started karate.  Jadon also loves orange!
Max loves golf and Stone loves to wrestle.
 Here is a screen shot of some of the cuts and layers.

 I welded the names (using Don Juan) to the Sports Mania images.

 Here is a link to a tutorial on how to make these notepads with a Bind-It-All HERE.

In addition to the note pads, I also gave the kids some "grown up" pens to use in them.  My son has already filled up his note pad with drawings and words.  I need to get busy with some more!!!