Copyright Information

Thank you for stopping by my blog! I hope you enjoy the things that I create and share! I do have a copyright on my original creations (see logo on my sidebar below).
If you create and post a creations based off of mine, please refer (with a link) back to my blog. Please do not use my ideas for files, profit or for contests. Thank you!


My Craft Goals for 2015

My Goals for 2015:

1. Update my goals for 2016 in January of 2016 :)
2. Maximize my crafting time!
3. Keep plugging away at scrapbooking photos!!
4. Learn how to Heat Press!!
5. Have fun!


Showing posts with label gypsy. Show all posts

Tuesday, September 16, 2014

Blinged Out Pumpkin

Halloween is my favorite holiday!!  I love the fall colors and decorating my house and daycare.  I found two different pumpkins on Pinterest that I loved - so I combined the two designs together.  I put my "L" on the front and gems on the top.

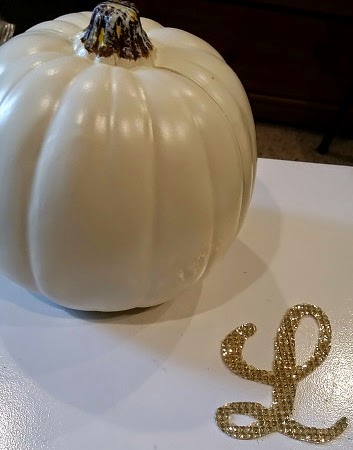
I purchased a 5 inch creamy white foam pumpkin from Michaels. 
My "L" was cut from a piece of gold Buckle Boutique Rhinestone Resin Self-Adhesive Sticker Sheet.  You can find these HERE (some colors are on sale right now too)!

I used my Gypsy with my cricut expression.  I got the "L" from Quarter Note.  I measured my pumpkin and determined the "L" should be around 3.5 inches.  I sized my "L" to 3.59 inches.  

I flipped the "L" to cut it out in reverse. 
The Rhinestone Sticker Sheets cut best face down on a sticky mat.  My mat is not as sticky as I would like, so I taped the edges down too.

Here are the instructions for cutting with a Cricut:

Cricut
  1. Use a deep cut blade
  2. Place your blade depth at 6
  3. Use a mulit-cut of 3 or 4 depending on how new your blade is
  4. Put your speed on slow
  5. Place the product face down on the Cricut cutting mat, making sure it is in a very sticky spot.  I usually run my hand over it to really make sure it is stuck down.
  6. Use Flip Mode on your Cricut  (since you have the product upside down, you need to flip the cut for the image to be correct when you flip it over)

Here is the "L" cut out.  I peeled the backing off and stuck the "L" on the flattest side of the pumpkin. 
It looks pretty, but I wanted a little more sparkle!! 
I purchased these gems from Michaels,  The pack includes clear, gold, dark grey and black crystals in 3 sizes.  I used Beacon 527 glue to adhere them to the top of the pumpkin.

I put 5 or so dots of glue on at a time and stuck the gems on. 
I am so happy with how this turned out!!

I hope you have a Blingy Fall!!


The Buckle Boutique's Link Listing
The Buckle Boutique's Website . . . click HERE
The Buckle Boutique Blog . . . . click HERE
Facebook Page . . . click HERE
Twitter Page . . . click HERE
Pinterest Page . . . clickHERE

Tuesday, August 12, 2014

Teacher Gift Card Holder

Today I am featured at The Buckle Boutique!!

I decorated this tin box to use as a gift card holder for Tanner's teacher.

I like to spoil his teachers at the beginning of the year, middle of the year (Christmas) and end of the year (Teacher Appreciation Day)!
I found an apple on the Plantin Schoolbook cartridge (Roly Poly function key) and used my Gypsy to size it to 2.05 x 2.18 to fit my tin.  

I used some red Dazzling Diamonds rhinestone sticker sheet.  It cuts in the Cricut Machine with a deep cut blade set at 6, speed 1 and sometimes it needs a multi cut.  The mat needs to be super sticky and to be sure I use packing tape to tape the edges of my sticker sheet down.  It cuts best face down so make sure you reverse your images before you cut them out! 
Here is the Cricut in action. 
You can see the cut.  This one was a single cut (no multi cut).

I just peeled the sticker sheet off the mat and popped out the apple. 
Very shiny!!  I love how you can cut through the diamonds as they are made out of a gel substance. 
I put the apple on the front of the tin window.  I used a black and white polka dot washi tape around the edge of the box. 
I used a scrap of black vinyl to cut Ms. Hunt's name and adhered it to the front.  This way she can re-use the box for some small trinkets or storage. 
I popped in the gift card and added a tulle ribbon.

You can find the red Dazzling Diamond Sticker Sheet HERE!

The Buckle Boutique's Link Listing
The Buckle Boutique's Website . . . click HERE
The Buckle Boutique Blog . . . . clickHERE
Facebook Page . . . click HERE
Twitter Page . . . click HERE
Pinterest Page . . . clickHERE


Wednesday, January 15, 2014

Fiesta Book Fair


It is that time again - The Book Fair at my son's school!

This year the theme is Fiesta!  I make one large sign, and three smaller signs to promote the event.  The school provides the large paper for the window sign and the large construction paper for the smaller signs.


I love volunteering my time this way - I get to be creative!!!

I started out searching my Gypsy as this is my third year making these signs and my first time since getting my cameo.  I did search in the Silhouette Store too!  I found some images I liked on both - so I used both!  A girl needs choices!!


I purchased this image from the Silhouette Store.  I cut it diagonally in order to make it as big as possible on a 12x12 mat.

I just moved the top layer into the picture, but I cut them out separately.


I also purchased these from the Sil Store - it is a banner.  I did not use the ribbon because my banner has more than 5 flags.  I cut these out in 4 different bright colors.


I used the font Wide Latin to size and cut out Book Fair.

The rest of the letters are cut from the font LD Mon Cherie and sized to 2.5 inches.

And from my Gypsy I used Fiesta for some images.  Fiesta is a digi cartridge that was a freebie the very last time I updated my Gypsy Girl, but it is available in Cricut Craft Room.

Here are the chili peppers.  I cut out 4 at a time.


I cut out maraccas.  I cut several colors of the layers so the Media Specialist can use them on other signs as well.


I cut out some pinatas too.  I made one at 11.5 inches to include on the large sign.  The rest were smaller to use on other signs as well.

I make 3 small signs promoting Blimpie  night including the menu.


The large sign is made using large rolled paper from the school.  This is on my 6' table.  I kept it simple so parents can read from their cars as they drop off their children.

I did add some orange circles to the pinata since there was a lot of red!

Get ready to Fiesta!!!


Monday, August 16, 2010

French Manor Border Fun!


A friend of mine recently purchased some Martha Stewart punches from HSN and showed me how to punch both sides of a strip of paper to make a really cool border.  She had a half of a daisy that made an adorable daisy border. 

 Today I was playing with my Gypsy and French Manor, and I found a border that can do the same thing! 

Select the border function key on French Manor and select the lacy scallop.  Put two of the images on the mat together and size.

  **Hint ~ when sizing multiple images or layers of images, put them all on the mat together so they are grouped and then size.

  I left mine at 1".  Ungroup and flip one of the borders.  Position it just below the first border and lining up the x coordinate ~ make it the same number for both pieces.

Move the bottom scallop up until it overlaps the top one just a bit.  Then group and weld together.  Below is a close up.

Here is the test cut.  There was one small piece that did not cut all the way and I did not want to tear this delicate cut ~ so I left it.

Wouldn't this be fun as a 11 1/2 inch border?!?


Thursday, July 1, 2010

Make A Mesh!

This is the sample card I made for my class at Michaels this week.  I demonstrated how to make a mesh background.  I used Gypsy Wanderings for this card since all of my Gypsy students have this one!!  This is a teaser ~ I will have detailed instructions for making a mesh on Monday here and on Sassy's BLOG.


Here is my friend's Gypsy (mine is not yet back from the spa) and I laid out the mesh, butterfly layers and sentiment all on a 12x12 mat.  On Layer 2, I put a 5 1/2 x 4 1/4 square to represent the card.  I can see this rectangle as I size the mesh.


I used a pop dot to raise up the butterfly.

I like making meshes to use as backgrounds ~ you have to look close to see what is in it!

Friday, June 4, 2010

Flippin for Flowers Giveaway!


I am honored to be back as a Guest Designer for Sassy today!! For those of you who don't know, my Gypsy screen cracked last week and I have been a little lost without her! Thankfully, I completed this project before she cracked!!

I wanted to try cutting fabric with my Cricut, and with summer right around the corner I thought this would be a great time mix my project with some summerwear!

I AM GIVING AWAY THESE FLIP FLOPS AND VISOR TO ONE LUCKY WINNER!! All you need to do is be a follower and leave me a comment here to have a chance to win! I will select a winner Sunday June 6th and will post that evening!!


I bought some fat quarters from Michaels and Wal-Mart as well as used some left over fabric that I already had. I picked up some hot pink flip flops and a visor from Michaels. My original color scheme was hot pink and zebra stripe. Well, the zebra stripes looked too chunky once the fabric was cut into small flowers. I changed out the hot pink for the orange flowered fabric. Lucky for me, I work at Michaels and was able to pick up another pair of flip flops and a visor in white!!


Cutting fabric is a bit tricky when you don't have a ton of patience like me! I almost quit more than once, but I do have a stubborn streak as well!

The first thing you need to do is iron Heat and Bond (or something similar) to your fabric. This will stiffen up your fabric and make it easier to cut. I did iron my fabric first to get out the wrinkles, then ironed on the Heat and Bond. My friend uses a heavy duty iron on paper, but this is all I found at Michaels. Next time I will seek out something more Heavy Duty!!


Following the directions on the package, place the paper side up (shiny side towards the fabric) and iron to the wrong side of the fabric. Do not peel off the paper until after you cut the fabric.


You should use a new blade and a new mat. My friend also recommends using painter's tape to tape the fabric down to the mat. This helps keep the fabric tight across the mat. I did not have painter's tape handy, so I tried scotch tape. It did not really seem to help much and it did not come off the edge of the mat easy.


I used Plantin Schoolbook for my flower shape and made four different sizes of flowers. The pink fabric cut the best as it was a pretty thick fabric I used to make drapes for my daycare with. You can see here the orange flowers did not cut well. I used scissors to snip the parts that did not cut through all the way. I did peel off the paper backing once I removed the flowers from the mat.


Once cut, I had a difficult time getting my flowers to have some texture. I tried running them through the crimper, but that did not do much. Crumpling does not work with fabric like it does with paper ~ that would have been too easy!!

I decided to poke two extra holes (one on either side of the middle hole) and gather the flower a bit. I used my Cricut dental tool for this and it worked like a charm. I only poked my finger once!! I used the biggest brad I had and poked it into the bottom hole, back up through the middle hole and down into the top hole to gather the layers together. I did this one layer at a time. I couldn't take a photo as I needed both hands and did not have a helper handy!


I glued a rhinestone on each flower. I used Tacky Tape to glue the flowers to the flip flops.

I made a third flower with the extra pieces and glued it to my visor with a glue dot.


So here you have a nice flowery pair of flip flops and visor!! This project was a bit frustrating, but I am glad I stuck with it!

Don't forget to leave me some feedback with a way to reach you so you have a chance to win!!

Monday, May 24, 2010

Vinyl Graduation Gift

I went to a graduation party for a good friend's daughter who was also a part time helper in my home daycare over the past two years. She is going to NW Missouri State to study education. I wanted to get her something special to take with her to college. Her comforter is black, hot pink and white so I used that as my color pallet.

I purchased some plastic storage tubs in clear and hot pink. I also found a dry erase board that is a mirror and a photo board. I picked up a few odds and ends as well.


I started with hot pink and cut out an A for Allison and a butterfly to stick on the clear tub. I used Nursery Rhyme for the font and Home Decor for the butterfly. When cutting vinyl, set your blade to 3. If you are not using a gypsy, set your pressure and speed to 3 as well for a kiss cut. A kiss cut is where the blade cuts through just the vinyl, not the backing.


After you cut your vinyl, you need to weed the extra vinyl away. To do this, I use my Cricut dental tool.


Once you weed the extra vinyl away, you need transfer tape or clear contact to pick up your image and transfer it to your project. I use my scraper tool to burnish the vinyl onto the clear contact paper. Cindy McVey taught me to "lint up" clear contact paper so it is not too sticky. You just wear your favorite pair of jeans and stick the contact paper to your lap a couple of times. This is similar to playing patty cake with your brand new cricut mats to get some of that stick off!!


Very carefully pull contact paper off of the vinyl backing and then smooth it on your project. Then I use my scraper to burnish the vinyl and carefully peel the contact paper off.


Here are the rest of the items I personalized with vinyl. I am kicking myself for not taking a photo of the gift all put together!! I decorated two large pink containers and 2 medium pink containers. I did have a bit of trouble getting the vinyl to stick to the memo board (I hope it stays!!) but soon it will be filled with photos!

I added a set of plastic buckets that are good for bathroom totes or small personal items. I put some things my son needed for his dorm room (tide pen, air freshner, hand sanitizer, clorox wipes, etc.) along with some tissue paper and the card. She loved it!